Monday, May 18, 2015

Falafel-Seasoned Cashews

Cashews roasted with falafel mix
Let's talk about spiced nuts. Actually, that's not the best term, "spiced", as it implies that the nuts are spicy-hot or enrobed in cinnamon and nutmeg. While that's not a bad thing, "spiced" omits such lovely seasoning ideas such as olive oil and za'taar, falafel mix with a pinch of cayenne and sugar (as in today's recipe), or simply a great curry powder blend. Is "seasoned" a better adjective?  Maybe. Or "savory" even though technically nuts are savory. Spices, spice blends, fresh and dried herbs, and other seasonings add an incredible amount of flavor without adding many, if any, calories. At any rate, nuts roasted with some kind of seasoning are delicious and are a great choice for a snack.

I made these for a baby shower and they may have been more of a hit with myself and the hostess than with anyone else. Luckily, I tripled the batch so there was more than enough for everyone.

Ingredients:

2 c unsalted cashews
2 TBSPS unsalted butter, melted
1/4 c falafel mix
1 TBSP granulated sugar
1/2 tsp ground cayenne
Salt to taste (*see the notes for further discussion)

Preheat oven to 350 degrees.

Line a rimmed baking sheet with a piece of parchment paper or foil and lightly grease. Set aside.

In a small bowl, combine the falafel mix and sugar.

Place nuts in a medium bowl and toss with the melted butter. Add the falafel mix and toss again to coat evenly. At this point, add the cayenne a pinch at a time and taste, taste, taste!

Spread nuts in an even layer on the prepared baking sheet. Bake for 9 or 10 minutes, stirring a couple times, until the nuts are golden.

Let cool completely before storing in a covered container at room temperature for up to a week.

Cook's Notes:


  1. Let's discuss the seasonings first. I have found that brands of falafel mix vary in spiciness and people's individual tastes vary as well, so the best thing to do is to add the cayenne a pinch at a time to the seasoning blend as I stated in the recipe and taste, taste, taste.
  2. The sugar in the recipe helps the falafel mix adhere to the buttered nuts and it adds a great contrast to the cayenne as well, kind of a sweet'n'spicy flavor. Don't omit the sugar.
  3. As you can see, the recipe calls for unsalted nuts and butter and has no added salt. Check the falafel mix, it probably has salt in it, so again, taste and adjust the salt to your liking. You can also add salt after the nuts are removed from the oven and are cooling.
  4. If you don't care for cashews, you're weird, but I love you anyway. You may choose your favorite variety of nuts; pistachios, almonds, walnuts or pecans would all pair well with this blend.
  5. While the recipe specifies butter, feel free to use your preferred type of fat; olive oil and coconut oil are both great choices or you can use a neutral flavored oil such as grapeseed to really let the seasoning shine through.
I'm planning on buying nuts in bulk at WinCo and making up some yummy snacks. If you try this recipe, let me know what you think!

Wednesday, May 6, 2015

Blondies

Not mine; this is a stock photo, but WOW!
I don't much like baking cookies. I like making cookies because I like eating the raw dough. I don't enjoy portioning out sticky globs, standing around for 12 minutes, and then coaxing the cookies off the the baking sheet and onto a cooling rack. Sooooo very boring.

I really like making bar cookies, though. After mixing up the recipe, you get to smush the dough into one baking dish, put it in the oven, set the timer, and walk away for 40 minutes. Plus, the entire thing needs to cool once it comes out of the oven and that takes a couple more hours which gives you more than enough time to sit down with a book or whatever it is you do to relax. I had a friend ask me what I did to relax and when I said that reading relaxes me, he looked at me in disbelief. His idea of relaxation was skiing or mountain biking. To each their own; I'm sticking with my books.

Oh, and also? There is no such thing as a brownie blondie or a blondie brownie; it's one or the other. If the dessert is primarily chocolate and looks dark brown and tastes fudgy, it is a brownie. If the dessert is a light golden brown, it is a blondie. Maybe it's pedantic or nit-picky; I prefer definite definitions.

Ingredients:

3/4 c butter, melted
1 c brown sugar, packed
1/2 c granulated sugar
1 TBSP vanilla extract
1 whole egg
1 egg yolk
2 c flour
1/2 tsp baking soda
1/2 tsp salt

Optional: up to 1 1/2 c of any kind of nuts, candy pieces, chocolate bits, and/or dried fruits.

Preheat oven to 325 degrees.

Grease the sides and bottom of a 9" by 13" glass baking dish and set aside.

Combine the melted butter and the two kinds of sugar; cream for two minutes til it looks pale. Add the vanilla, the whole egg, and the egg yolk. Beat together for an additional two minutes.

Add the dry ingredients and beat thoroughly. At this point, use a spatula to fold in whatever optional nuts, candy pieces, chocolate bits, and/or dried fruits you wish to include.

Transfer the dough to the prepared baking dish and use your hands to press the dough down evenly.

Bake for about 40 minutes or until the top is golden brown. Remove from the oven and allow the entire pan to cool on a wire cooling rack before cutting into squares. The recipe yields between two and three dozen cookies, depending on what size you want.

Cook's Notes:


  1. Wire cooling racks. If you don't have any, why not? You can pick some up at your local dollar store and while they're not the highest quality, they get the job done and that job is to allow air to circulate around and under your baked goods so the don't steam and become soggy. I have a really nice cooling rack which is laid out in a small square pattern and it provides better support to more fragile baked goods. The cheaper racks generally consist of parallel wires and are better for cooling glass baking dishes and loaf pans. 
  2. The original recipe from which this one as adapted, calls for those lovely mini Cadbury eggs that are only available at Easter. I'm not much of a candy-eater (candy-consumer? candy-devourer?) any more with two exceptions; those crunchy, chocolatey eggs and the milk chocolate Lindt balls. Those things are lusciously, meltingly evil. I digress. You can customize the blondies in any way you choose; white chocolate chips and craisins or M&Ms (plain or mint or peanut butter) or butterscotch chips or whatever.
  3. Unlike many cookie recipes, this one calls for melted butter. Why not make beurre noisette? That's French for browned butter. Since it imparts a nutty flavor to baked goods, enhance that flavor with some toasted, chopped almonds, with chunks of high quality dark chocolate and maybe some chopped dried cherries.

Wednesday, April 29, 2015

Fresh Merguez Sausage

Ridiculous, I know, but still funny!
Sometimes when I'm looking at recipes, I run across an unfamiliar seasoning. Keep in mind that I am a Caucasian living in a very Caucasian part of the greater Seattle area, so while I'm conversant with specific ingredients, there are many, many more which are truly foreign to me. Merguez sausage was one of them. It sounded intriguing so I followed the link (pun intended). The list of hers and spices which make up this particular recipe are all well known to me and sounded delicious, and are all common enough ingredients found at any grocery store. 

So, what exactly is Merguez? Found mainly in North African cuisine, Merguez is also popular in the Middle East and in parts of Europe, particularly France. Like a lot of foods, it has more than one specific iteration. It's primarily a fresh, spicy and red-hued sausage made from ground lamb. It can also refer to a dried sausage, kind of like andouille or some kinds of chorizo; excellent for slow cooking as it infuses the dish with tons of flavor. Merguez gets its color from a high amount of paprika and its lingering spiciness from cayenne. The thing I like best about Merguez is that you can adjust the seasoning to your specific taste preference. Don't like spicy food? Leave out the cayenne. Prefer a little more sweetness? Use more ground cinnamon. Just make sure you use the same proportions overall.

I like lamb although I don't buy it very often due to its higher price in my part of the world. It runs about $8 per pound but I think it makes a nice change from ground beef. You can certainly use any ground meat you prefer; beef, turkey, chicken, pork, or a combination of any of them. The original recipe used ground lamb and called for making sliders topped with tzatziki sauce on brioche buns. The brioche adds a nice sweet, buttery flavor and the tzatziki sauce balances out the heat with the cooling effect of cucumber and sour cream.

**Yields enough to season one pound of ground meat

Ingredients:

1 TBSP paprika
2 tsps salt
2 tsps ground cumin
1 tsp ground coriander
1 tsp whole fennel seeds
1 tsp garlic powder
1/2 tsp black pepper
1/2 tsp ground cinnamon
1/4 tsp cayenne

Combine all ingredients in a small bowl or container and use a fork to whisk together. 

Add the entire amount to a pound of ground meat and use your hands to work the seasoning thoroughly into the meat. The resulting mix should be a uniform reddish color. 

Form into whatever shape you prefer: patties, meatballs, or elongated and slightly flattened meatballs like a kebab. You can bake, grill, or fry the Merguez. Serve with fresh tzatziki sauce, shredded lettuce, chopped tomatoes, and flatbread or pita for a delicious meal.

Cook's Notes:

  1. The original recipe called for fresh garlic which is all well and good except that I made the seasoning blend up a few days before I was able to actually make and cook the sausages. I simply substituted garlic powder and I think it works even better than fresh garlic because garlic powder blends more easily into the overall flavor. I like garlic, don't get me wrong, but I don't like getting a mouthful in one bite and none in another.
  2. The sausages turned out more dense than I expected, which is not a bad thing, but I think next time I'll include a panade. Such a fancy word! Basically, it's soft white bread that been cubed, soaked in a mixture of cream and eggs, and then incorporated with the ground meat. It binds the ingredients without soaking up the fats like plain ol' breadcrumbs do and traps and enhances the flavors of the seasoning. Panades are used in any ground meat dishes, such as meatloaf and meatballs. We can discuss panades further in another post.
  3. I've been eating the Merguez in whole wheat tortillas with tzatziki sauce. They're surprisingly filling; I can eat two for a late lunch and just have an apple for dinner.
If you try Merguez this summer at a barbecue, let me know what you think! They would add some great variety to the usual grill offerings in either patties or formed around skewers for a kebab.


Sunday, April 26, 2015

Quick update or, why I haven't posted in the past couple months

Well, so much for my plan to make up to eight new dishes each month and blog about them. The weird thing about life is that life gets in the way, right? Some days I just don't have enough energy or drive or passion left to make myself dinner, let alone be creative in making dinner. It's hummus and pita chips for me! 

I've started catering on the occasional weekend this spring for a local production company shooting an indie film. I've found the most difficult part of any catering job is both coming up with menu ideas and whittling down all the ideas to a balanced and manageable amount of food. My fear (unfounded to date) is that there won't be enough food and that someone will feel left out due to food allergies or intolerances. 

Plus, I have a baby shower coming up next weekend which I'm really excited about. I've known her and her family for close to 30 years. The baby mama is vegetarian and her sister who is hosting the shower has various food restrictions and needs to be gluten free, egg free, and cow's milk free. I enjoy the challenge of planning and making a variety of delicious foods for people who have allergies and/or restrictions. 

I've been slacking on a cookbook project with a girlfriend who lives in a different state. While she and I have compiled a number of recipes I think will fit our criteria, we need to whittle them down, categorize them, test them, and have volunteers also test them out.

And on top of all that, I'm working with a girlfriend to come up with ideas of items we can make and offer for sale around Christmas. So many people love the concept of a homemade gift and yet they run out of time to make stuff. I'm hoping to partner with an urban beekeeper I know in Seattle and sell some of our products at her holiday bazaar later in the year.

Part of my problem is (and this is purely my fault) that I don't set aside a specific time each and every day to write. I need to make writing a priority and write each and every day, even if it's by hand. Which I don't mind doing but sometimes the stupid carpal tunnel flares up and makes it very uncomfortable. I also need to be more adaptable in my choice of "office". I love love love my local coffee shop for many reasons but a quiet working environment is not one of them. Same goes for my local library; too noisy and no carrels. I wish I could work at home, however, I get distracted too easily and I don't have the quietest housemates. All of these are excuses, though, because if I truly want to write, I will find time to write.

So, cheer me on, my faithful readers--I'll take all the encouragement I can get! 

Tuesday, February 10, 2015

Asian Inspired Coleslaw

Last September, for the very first time in my entire life of living in Washington State, I visited Mt Baker which is clear up at the northern boundary of the state. It was sunny and clear, quite warm when the glacial wind wasn't blowing, with the odd patch of snow at Artist Point and along the trails. I'm not an outdoorsy person, like a hiker or a camper. I'm an ambler, as in, I prefer to amble along flattish paths in a temperate forest. It didn't even occur to me that I'd be on the top of a mountain. At the end of September. So there I am in my hot pink Converse and lightweight cardigan (because I get warm very easily), on the top of a mountain, surrounded by serious hikers and serious tourists in fleece vests and thermal jackets and actual hiking boots. It was surreal. My friend who is an advance amateur photographer and actual outdoors man, took off on one of the paths that went further up the mountain. I, on the other hand, found a nice sunny log to sit on and people-watched. And get a mild sunburn, which is something else that didn't occur to me. I joke that I must've been a dog in a previous incarnation because I love to ride in the car, even short trips, but I think I was a cat in many more incarnations. I'm essentially lazy, I prefer my own company and I'm finicky about allowing other people into my personal space, I think about food constantly, and I'm quite happy to observe rather than participate.

Mt Baker as seen from Artist Point


After my friend had taken all the photos he could possibly take, we eventually headed back down the mountain for a late lunch at an unassuming diner across the highway from an Italian restaurant. I ordered a pulled pork sandwich and it was served on a pile of french fries with a side of coleslaw. Now, I'm super-picky about coleslaw. All too often, it's a sweet, watery mess which detracts rather than complements a meal. This coleslaw was amazing. It had cilantro and scallions mixed in with the cabbage and a sweet chili dressing that had a bit of bite without being cloyingly sweet. After the first couple bites, I piled the slaw on my sandwich and inhaled it. By nature (or perhaps nurture), I'm a slow eater. I like to take my time and enjoy my food. That was not the case with this meal! The pulled pork was smoked in-house with apple wood and seasoned just right, and heaped on a toasted ciabatta roll. I'm not a huge fan of ciabatta as they ought to have a chewy crust and a soft interior, yet I've found that most commercial ciabatta are dry and bland with nothing to distinguish them from another other bread roll.

Since then, I've craved that coleslaw. The first thing I needed to do was find a sweet chili sauce that wasn't too sweet nor too spicy. I made a trip to the Korean grocery, H-Mart, as I needed to pick up some sesame oil, veggies, and a few other staples. I was also looking for fresh wide rice noodles which for some reason they don't carry. They did have frozen hom bao on sale; yum! I love those things! Anyhow, I picked up a bottle of sweet chili sauce, pretty much at random and because it was $1.49. For that price, I figured I'd give it a try.

So yesterday afternoon, I made up a batch of Thai Inspired coleslaw. I was planning on eating it with some cheese'n'bacon brats but then I decided to make some barbecued pulled pork as I needed to cook a roast before it went bad. The sauce for the pork was a bottled mustard-based barbecue sauce to which I added brown sugar and honey to counterbalance some of the acidity. The pork turned out great and so did the slaw. I'll pick up some crusty bread today so I can make my very own pulled pork and slaw sandwich for dinner!

Asian Inspired Coleslaw


Ingredients:

**All measurements are approximate so adjust as needed
**Yields about 4 cups

4 cups cabbage, thinly sliced or shredded
2 carrots, grated on the bias (that means diagonally)
5 scallions, white and green parts thinly sliced on the bias
5 radishes, top and tailed, cut in half and thinly sliced
2 tablespoons cilantro, finely chopped

Dressing:

1/4 cup sweet chili sauce
1 heaping tablespoon mayonnaise
1/2 teaspoon sesame oil or more to taste
Juice from half a lime or more to taste
Salt and pepper to taste

1/4 cup crushed roasted unsalted peanuts for garnish

Combine the veggies and cilantro in a large bowl. Whisk the ingredients for the dressing together in a smaller bowl, taste, and adjust the seasonings as needed. 

Toss the veggies with the dressing no more than 15 minutes before serving so the slaw doesn't become watery. Garnish with the peanuts and more cilantro, if you'd like.

Cook's Notes:


  1. Feel free to use bags of coleslaw mix. Cabbage can be oddly expensive as they're sold by weight and are rather heavy for their size. Since I was at an Korean market with a great variety of inexpensive produce, I picked up a small head of green cabbage and small Napa cabbage. I used about 1/3 of the green and half of the Napa. Purple cabbage would add nice color to the slaw; use whatever you prefer.
  2. Most slaws include carrots, as I did. They provide a little sweetness and some great color. Grate them on your hand-held grater, holding them at an angle in order to produce longer, intact shreds. Currently, I don't have a grater so I used my vegetable peeler instead to make strips. It worked pretty well.
  3. I like the crunch of radishes and their slightly peppery heat so I decided to include some with the other veggies. You can omit them, but why not give them a try? Make sure you rinse them well as they often still have mud from the fields on them. If you're really adventurous, try shredded daikon or an heirloom variety. 
  4. I called this an Asian Inspired slaw, which is true. It's perhaps closer to being Thai in that the ingredients include scallions, cilantro, lime juice, and peanuts. 
  5. If you don't wish to use mayo in the dressing, try a neutral-flavored oil like grapeseed instead, peanut oil which will enhance the peanut flavor, or a stir fry oil which is safflower oil seasoned with garlic, ginger, and onion. I personally wanted a creamier dressing but it's up to you.

I still have most of the sweet chili sauce left. I'm thinking I'll use it to glaze chicken before grilling later in the year or perhaps in a pan sauce for shrimp or in a dipping sauce for spring rolls...

Saturday, February 7, 2015

Jean's Chicken & Chips Casserole

This is not a healthy recipe. Let's just get that outta the way right up front. This is a comfort food casserole all the way, baby! And it's retro. Like, serve-it-on-melamine-plates-at-the-formica-table retro. With Kool-Aid in jelly jars with cartoon characters printed on them. In my opinion, any recipe that calls for mayonnaise and Lay's potato chips is retro. I'm surprised the hipsters aren't all over this...except there's no quinoa or kale in sight! 

I think the casserole we ate the most frequently growing up was tater tot casserole and I know it's a comfort food for one of my brothers. I mean, you can't go wrong with a ground beef gravy topped with cheddar cheese and tater tots. I don't recall ever eating tuna noodle casserole as a kid and I think it's because my mom grew up eating it and couldn't stomach the thought (pun intended) of eating it ever again. She was the second oldest of six kids, four of which were boys and money was tight, so my grandma made a lot of inexpensive yet filling casseroles. 

After my mom passed away less than a year after my dad died and I was still deep in grief, my mom's best friend, Jean, called me one day and stated she was going to bring me dinner. I don't remember very many things in detail from after my parents' deaths; most of it's a hazy memory. I do remember a handful of comfort meals and this was one of them. Jean brought this casserole over and then whipped up banana pudding for me, the kind with Nilla wafers, and then she just sat and reminisced and cried with me. I've known Jean for 35 years ate this point, virtually all of my life, and it's so comforting to have a tangible link to my childhood and to my mom.

Mmm, delicious! How can you go wrong with a potato chip topping??

Ingredients:

2 cups cooked chicken, shredded
1 cup celery, diced
1/2 cup mayonnaise
1/2 cup slivered almonds
1/4 cup onion, diced
1 teaspoon lemon juice
Salt and pepper to taste

Topping:

1 cup sharp cheddar cheese, grated
1 cup plain Lay's potato chips, crushed

Preheat oven to 350 degrees and lightly grease an 8" by 8" baking dish. Set aside.

In a large bowl, combine the chicken, celery, almonds, and onion with the mayonnaise, lemon juice, and a pinch of salt and pepper and mix well. Taste and adjust seasoning of necessary. Transfer to the prepared baking dish and top with the cheese and potato chips.

Bake 30 minutes until heated through and the cheese is melted.

Cook's Notes:


  1. First things first: I will not give you any substitute ingredients because that's not what this casserole is about. This casserole is all about love and comfort and memories. I wasn't kidding about no quinoa or kale in sight. Maybe some broccoli, though.
  2. The recipe doesn't have a high yield, maybe four cups max or four servings. It's super-easy to double or triple, though.
  3. You can either poach some chicken breasts and/or thighs to use or feel free to pick up a rotisserie chicken from the market. I'm pretty sure I've mentioned this before; my local Albertson's occasionally sells packages of shredded chicken from the previous day's unsold rotisserie chickens. Unless raw chicken is on sale, this is a great way to go. It ends up costing about the same about of money per pound plus it cuts out a step; poaching.
  4. I like the crunch and bright flavor of celery and I think that it helps balance the heavier flavors from the mayo and cheese in the finished dish. If you despise celery, I suppose you could use broccoli instead. Frozen broccoli is too slimy for me so I recommend using fresh broccoli and steaming it before adding to the chicken mixture.
  5. I have a trick for you: after you dice the onion and before you add it to the chicken mixture, place the diced onion in a small bowl and cover with cold water. Let soak for five minutes and then drain and rinse under more cold water. Blot with paper towels to remove as much water as possible and then proceed with the recipe.
  6. Using just mayonnaise as a binder seems weird, I know. Combined with the lemon juice, it works; think of it as a hot chicken salad. Which also sounds weird. But it's delicious.
  7. I prefer using sharp cheddar in casseroles and savory baked goods as you're able to taste the cheese while medium or mild cheddars just aren't assertive enough. 
  8. I nearly forgot the almonds! I guess you can omit them; I like the crunch and mild flavor they add. Last time I made this, I used dry roasted diced almonds which I bought in the bulk foods section for another recipe. Since they were dry roasted, the almonds supplied a deeper toasty flavor which I think enhanced the casserole.
Serve chicken'n'chips casserole with green bean casserole, iceberg lettuce salads, and banana pudding for a true throwback meal!

Tuesday, February 3, 2015

Adventures in Making Energy Bites (or, How I Should Maybe Follow a Recipe)

As I may have mentioned in the past, I have an aversion to following recipes. It's not a bad thing to cook by instinct and intuition, however, I need to cultivate the habit of following a recipe closely the first time I make something new. Case in point, the energy bites I made yesterday. I've been reading a bunch of recipes for energy bites and bars because I'm terrible about eating breakfast. I thought if I made up something I can nibble on, it would alleviate the "hangry" feeling that creeps over me a couple hours after I get up. Plus, I am very, very slow to fully wake up. One of my friends calls it "hatching" which I like because that's exactly how it feels. I always have to reassure people that if I don't talk or interact with them within the first hour or so of waking up, that I don't hate them! My mind is fully functional, there's just a disconnect between my mind and my mouth. 

So, after reading various recipes for energy bites and sampling some of my sister-in-law's she made a couple weeks ago, I went grocery shopping. Bulk food shopping, to be exact. I picked up some old fashioned oats, coconut flakes, roasted almond pieces, and fresh ground peanut butter. I had honey, coconut oil, flax seeds, and a dark chocolate bar at home, so I was set. 


Ingredients:

3 cups oats
1 cup roasted almond pieces
1 cup peanut butter
1/2 cup coconut flakes
1/2 cup coconut oil, melted
1/3 cup honey
1/3 cup flax seeds, slightly ground
1 bar dark chocolate, chopped
1 TBSP vanilla extract
Pinch of fresh grated nutmeg
Pinch of salt

**These are the amounts of the ingredients I used, to the best of my recollection. DO NOT follow these proportions! The resulting bites are delicious but so very crumbly! I need to refine the recipe. Or, you know, follow someone else's recipe to the letter.

Cook's Notes:


  1. This made a huge batch, which is what I wanted. I mean, there's over 5 cups of dry ingredients. I wanted to make enough to last me for a couple weeks. And it will.
  2. In retrospect, I should have melted the peanut butter with the coconut oil and the honey as I think the mixture would've come together easier. I also think I should've increased the total amount of peanut butter and coconut oil as the mix was very crumbly.
  3. About half the recipes I researched used dates as a binder and then called for using a food processor to combine the ingredients. As my food processor is currently in storage, I decided to use peanut butter, coconut oil, and honey as the binders instead.
  4. Flax seeds, unless they're ground, won't be digested which means you're not getting any of their nutrients. I used my mortar and pestle to smash them up before adding them to the bowl. I thought about buying ground flax seeds but I had whole ones on hand and want to use them up.
  5. I personally love the taste and texture of coconut flakes and grated coconut. It adds just a touch of sweetness without being overpowering.
  6. Someone had given me a bar of Hershey's Special Dark awhile back. I used my mortar and pestle to smash it up into small pieces. I could've used a really sharp knife instead to chop up the chocolate, but I didn't. 
  7. A little vanilla extract enhanced the mix as did the fresh nutmeg. I'm not a huge fan of cinnamon unless we're talking cinnamon rolls which is a whole other delicious story! The nutmeg and the salt added just the right notes to round out the mix.
  8. Since the resulting mixture was crumbly, I decided to squoosh it together as best I could and place the bites in cupcake liners instead. I ended up with nearly two dozen, two-bite energy balls. I place them on a cookie sheet and let them set up in the fridge for an hour, then transferred them to a plastic container (with a lid) with parchment paper between the layers and stored them in the fridge. 
  9. The thing I like best about my creation are the roasted almonds because I love almonds. Love them so much! And since they're roasted, the almonds add great flavor and crunch. I decided not to add dried fruit for my first batch; I'm not a huge fan of them. Perhaps I'll make a tropical batch with more coconut, dried pineapple, and macadamia nuts. 

Saturday, January 24, 2015

Cheese & Herb Scones

I'm of two minds about scones. If I make them or buy one from an independent bakery, they're amazing and delicious and tender and buttery. If I purchase them at a coffee shop or a chain grocery store, more often than not they're dry and crumbly and not that tasty. Drizzling glaze over them only makes them hyper-sweet and sometimes hard as cement; the glaze ends up glueing together chunks of flavorless crumbs. Ick.

I started making scones about the time I started high school. Someone gave me a little cookbook of scone recipes, both sweet and savory, and I immediately fixated on one particular recipe. It called for finely chopped walnuts in the dough and then before baking, you cut a slit in the top and slid in a teaspoon of strawberry jam which bubbled up in the oven and glazed the top. My dad loved them so I never varied that recipe. I've made other kinds of scones since then; lemon blueberry (pictured below), almond cherry, currant, and white chocolate craisin. 


My first savory scone was from a bakery in Leavenworth, Washington (which is a Bavarian themed village in the Cascades and not the penitentiary in Kansas). It was chock full of cheddar cheese, bacon, and scallions in a tender, buttery dough and I could've eaten a few more of them and skipped lunch altogether. This particular recipe focuses on fresh herbs and cheese rather than bacon and scallions, but they're just as delicious!

My first attempts at replicating savory scones weren't great. I mean, they were edible and had bacon in them, but they weren't very tender and flaky. There are a few ways to make tender and flaky baked goods; use real fat (butter and/or lard), handle as little as possible, and increase the amount of protein and fat by adding eggs and/or some kind of dairy. Don't freak out on me here. The fats and proteins are what make baked goods tender (not dry) and flaky (a desired result in pastries and pie crusts). If you're looking for a low-fat option for scones, you won't find it here.

Ingredients:

2 cups flour
1 teaspoon baking powder
1/2 teaspoon salt
1/4 teaspoon baking soda
1 stick butter, cut into small pieces and frozen (leave in freezer until needed)
1 cup grated or shredded Cheddar cheese or other cheese of your choice
1/2 cup fresh herbs of your choice, finely chopped
1/2 cup sour cream
1 egg

Preheat oven to 400 degrees. Line a baking sheet with parchment paper and set aside. You can also use a sheet of foil, lightly greased, to line the baking sheet.

In a small bowl, whisk the egg and sour cream together and set aside til needed.

In a large mixing bowl, combine the flour, baking powder, salt, and baking soda. Use a fork or a whisk to combine. Add the frozen butter pieces and use a pastry cutter to work into the flour mixture until it resembles coarse sand. Add the cheese and herbs and toss gently to coat with the butter and flour mixture. Use a fork to stir in the egg and sour cream mixture until just combined. Using your hands, turn the dough out onto a floured surface and divide into two equal balls. Pat each one flat into a disk and use a sharp knife to cut into wedges.

Transfer to the prepared baking sheet. If you like, brush the tops with melted butter or a beaten egg. Bake for 15 to 17 minutes or until golden brown. Allow to cool on the baking sheet for a couple minutes and then transfer the scones to a wire cooling rack.

Cook's Notes:

  1. Let's start with the herbs. The creator of the original recipe wanted a recipe that used up a lot of her herbs from her garden. A half cup may seem excessive, especially if you're not accustomed to using fresh herbs in your recipes, but fresh herbs don't have the same punch of flavor as dried herbs. Once dried, the aromatic oils in herbs are concentrated which is perfect for adding to dishes which need to cook for a long time. Fresh herbs are best for adding as a garnish to a completed dish, to salads of all kinds, or to quick breads and scones which don't spend a lot of time in the heat. If you're fortunate enough to have an herb garden or you know someone who grows herbs, you can mix'n'match: thyme, dill, rosemary, parsley, tarragon, oregano, basil, mint, cilantro, savory, etcetera and so on. Rinse the herbs, pat dry with paper towels, and use a very sharp knife to finely chop.
  2. I prefer to use sharp Cheddar in baked goods as the flavor stands up better than medium or mild Cheddar. Like the herbs, the choice of cheese is up to you. Try Gruyere and mozzarella with oregano, basil, thyme, and a little mint for an Italian flavor. Use a blend of pepper jack and white Cheddar with cilantro, parsley, and oregano for a hint of the Southwest. 
  3. Butter, people, real butter. It can't be beat. And even though a lot of recipes call for unsalted butter so that the baker can adjust the amount of salt to their preference, I always use salted butter because it adds another layer of flavor. Plus, salted butter's often less expensive than unsalted. 
  4. I generally buy store brands products unless name brand are on sale and comparable. I make a few exceptions for items such as Best Foods mayo and Daisy sour cream. I'm not sponsored by these brands nor do I get reimbursement or freebies from them; they're just tried'n'true brands. I really like Daisy sour cream because it only has one ingredients: Grade A cultured cream. There are no stabilizers, no additives, and no preservatives. I like the fresh tangy flavor and the only drawback (if you can even call it that) is that the sour cream "weeps". I either stir the liquid back into the sour cream or drain it off into the sink.
  5. I've pretty sure we've discussed pastry cutters before and if you don't have one, get one. They're not expensive and they're much more effective and efficient than using a couple of forks or knives to try to cut hard chunks of butter in to the flour mix.
  6. Let me leave you with two very important pieces of advice: first, keep the fats (butter, sour cream, egg) as cold as you can. The cold fats between layers of flour is what creates the flakiness in the finished product. As they heat up in the oven, the waters boil and create steam which puffs up the dough. Second, work the dough as little as possible so you don't create gluten which gives baked products like bread their chewiness.
These cheese and herb scones are great with soups and salad or as an alternative to rolls alongside a pot roast or grilled salmon. Don't be intimidated by all my instructions; it just sounds difficult! And I rather give you more info than not enough.

Tuesday, January 13, 2015

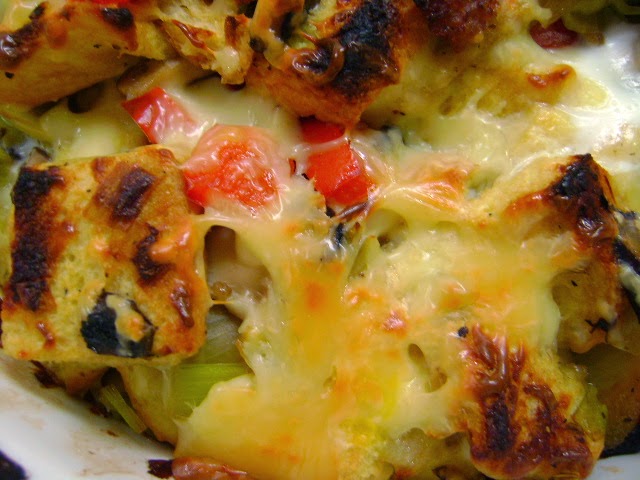
Savory Mushroom & Leek Bread Pudding

First off, I need to admit something to you: I dislike taking photos of my food. Apparently, the Instagram gene is not present in my DNA. I don't like taking the time at every step anymore because it slows down my efficiency; the lighting is not good in the kitchen where I work (fluorescent bulbs everywhere); and most importantly, it bugs me that some of the food blogs I read have more similar looking photos of the recipes in various stages than they have actual instructions. In fact, I just looked at one blog, counted the number of photos in ten different posts and came up with an average of 31 photos per post. If you want 31 of something, then visit your local Baskin Robbins. Who has that kind of time? Well, people who get paid for blogging have that kind of time, and I don't get paid. Plus, I'd rather be reading a cookbook or a great thriller than snapping away in the kitchen. Anyhow, I want to include one photo per post so you have some idea of what the completed dish looks like. Or should look like. Actual finished products may vary.


So, bread pudding. Most people think of bread pudding (if they think of bread pudding at all) as a sweet dessert. Found in cultures all over the world, sweet bread pudding utilizes stale bread in a mixture of milk, spices, some kind of sugar, sometimes liquor, and usually dried fruit of some type. Savory bread pudding takes the same concept of using up stale bread but instead of sweet additions, you add sauteed vegetables, grated cheese, and sausage. Similar to stuffing or dressing that's on the table for Thanksgiving or Christmas feasts, savory bread pudding is a great accompaniment to big pieces of protein, like turkeys or roasts. Even better, you can customize the ingredients to your particular taste. Don't like bell peppers? Leave 'em out. Have extra broccoli? Toss it in. Prefer turkey sausage? It's your dish; make it the way you like it.

Ingredients:

1 red bell pepper, diced
2 leeks, white & light green parts, sliced & rinsed well
3 cups mushrooms, sliced
1/2 pound bulk Italian sausage
1/2 pound Gruyere, grated
10 cups cubed day old bread
3 eggs, whisked together
1 1/2 cups whole milk
1 tsp fennel seeds (optional but highly recommended)
salt & pepper to taste

Preheat oven to 350 degrees and set out a large baking dish or two smaller ones.

In a small bowl, whisk the eggs and milk together with about half of the grated Gruyere and set aside.

In a large stockpot, cook the sausage over medium high heat until browned. Reserving the rendered fat, scoop out the cooked sausage and set aside. Add the bell pepper, leeks, and mushrooms to the rendered fat still in the stockpot and saute for 5 minutes or so. Season the veggies with salt and pepper and the fennel seeds if using. Cook a few minutes more. Remove from heat.

Add the stale bread cubes and toss to combine with the sausage and veggie mixture. Transfer to the baling dish(es), pour the milk and egg mixture over, and top with the remainder of the grated Gruyere.

Bake for about 40 minutes, uncovered, and then broil for a few minutes to brown the top, if you'd like.

Cook's Notes:


  1. The kind of bread you use is completely up to you. I found a great loaf of brioche sandwich bread which added a great buttery and slightly sweet flavor which paired well with the red bell pepper and leeks. You can use a sturdier bread, like a sourdough; completely up to you. At least two of my local markets carry bagged cubed bread in their bakeries. Just make sure that the bread is truly stale and a little hard; if it's too fresh and soft, the end result will just be mush.
  2. Leeks don't get the love they deserve. They're in the same family as onions and garlic, Allium, and have a mild flavor somewhere in between the two. I've found that most markets sell leeks in bundles of three; go ahead and buy a bundle. Leeks are pretty hardy and can last in the fridge for longer than you might think. You can also slice them up and freeze them if you'd like.
  3. Mushrooms. I love mushrooms. I wish more people loved mushrooms because then there'd be a more of a demand for different varieties in the local markets. I didn't have the time this past week to go to the Asian market where they carry at least a half dozen varieties, if not more, but I was quite pleased to find fresh shiitakes alongside the more pedestrian white and crimini mushrooms in one of the local stores. Use whatever mushrooms you want.
  4. When I was frying up the sausage, I decided that it needed some flavor, so I added whole fennel seeds. Yum! I think next time I may increase the amount of fennel; I could taste it but not as strongly as I'd prefer.
  5. Gruyere. This is a mild young Swiss cheese, slightly sweet and salty and nutty. It add savoriness without overpowering the other ingredients in the dish, such as quiches, crostinis for onion soup, and chicken cordon bleu. You can certainly use good ol' cheddar, but I urge you to break out of your cheese mold (see what I did there?) and try something new.
Serve savory bread pudding with roast chicken or a pork or beef roast and a nice green salad on the side. Give it a try and let me know what you think!


Sunday, January 11, 2015

Irene's Peanut Butter Cookies

I have a love/hate relationship with making cookies. I love mixing up a batch & sneaking bits of raw dough; I hate standing around for minutes at a time waiting for each tray to bake. Also, the ovens I've used in the last several years have tended to run hot and as much as I've tried to adjust the temperature, I just am not pleased with the results. The cookies spread too much & the edges get darker than the center and I get frustrated.

Irene was my paternal great-grandma and I'm fortunate enough to have known her into my teens. She lived to be 94 and was just a character. She loved watching WWF, the Seahawks, and the Sonics; she wore a perpetually crooked wig; and I believe there's only one photograph of her in trousers. She always wore house dresses. She grew African violets and had a dozen or more in her living room window. I've tried to have a few over the years in her memory and I just don't have good luck with them. Probably because I prefer my living environment much cooler than Irene and the violets did! At least I can make her peanut butter cookies.

Ingredients:

1/2 cup butter, room temperature
1/2 cup shortening i.e. Crisco or good ol' lard, room temperature
1 cup peanut butter
1 cup packed brown sugar
1 cup white sugar
2 eggs
1 teaspoon vanilla extract
3 to 3 1/2 cups flour
1 teaspoon baking soda

Preheat oven to 375 degrees.

Combine 3 cups of flour and baking soda in a separate bowl & whisk to combine.

Using a large mixing bowl or stand mixer, combine the butter, shortening, brown sugar, and white sugar. Cream together for at least 2 minutes; you want the resulting paste to be light in color and creamy. Add the peanut butter and vanilla beat well. Add the eggs, one at a time, beating well after each addition. Tip in about half the flour mix and mix well, then add the remainder of the flour. If you need to, add up to a half cup more of flour to make a thicker dough.

Portion out the dough on ungreased baking sheets. Using a fork dipped in granulated sugar, gently press down the dough, creating a criss-cross pattern on top.

Bake for 10 to 12 minutes or until the edges are brown and the tops of the cookies don't look greasy. Leave on the baking sheets for an additional two minutes before carefully transferring to coolong racks.

Cook's Notes:

1. I prefer crunchy peanut butter for everything, even Thai peanut sauce. You can certainly use creamy peanut butter if that's what you have in your pantry.

2. Listen. Creaming the fats and sugars together is really important. Sugar granules have sharp little edges and as they're agitated during the mixing, they cut into the fats and add air to create a leavening effect.

3. Don't over-bake the cookies; check them after 8 minutes and see if the tops have lost their sheen & gotten a little darker on the edges. Cookies also continue to bake as they sit on the baking sheets. You want them to cool for at least 2 minutes before transferring to wire cooling racks so they don't fall apart.

4. These are nice sturdy cookies which freeze well and even ship well. 

5. You can easily turn them into peanut butter blossom cookies which just means that you place an unwrapped Hershey's Kiss in the center of each unbaked cookie. Yum!


Friday, January 9, 2015

A Story of Braised Beef or How I Made Stroganoff From Cheap Meat

I've had a beef short rib craving since summer. I tried short rib sliders at two different locations and because I didn't write them down (which is something I think I need to start doing), I can't remember exactly how they were seasoned. All I can remember is how meltingly delicious the meat was on those little brioche buns. YUM!! I've made short ribs once since then, simply seasoned with salt and pepper, and I want to try other flavors, like a red wine braise or a sweet chili one. The problem I run into is cost. Short ribs used to be cheap, like flank steak, but because the cuts have become popular with celebrity chefs, the cost has gone up. Because beef short ribs are marbled with fat, the cut needs to be cooked low and slow in moist heat; braised. This allows the fat and collagen to break down and renders the meat so moist and tender.

I went in search of beef short ribs this last week. I ended up buying chunks of beef on the bone, which was labeled as "bone-in beef stew chunks", mainly because they were on sale and also because I wanted to see what I could make from them. They went into the slow-cooker with a little salt and pepper and braised for 10 hours. I then stored them in the fridge as-is, still in the slow cooker insert and still in their own rendered fats, gelatin, and juices. There's a couple of reasons I do that; first, it allows the meat to reabsorb some of the moisture lost during cooking. Second, once the meat cools, the rendered fats harden on top of the cooked meat and you can pull it off in chunks rather than trying to deal with hot fat.

I spent some time deciding what in the world to do with this mess of meat. Once I pulled the meat off the bones (and there were a lot more bones than I expected), I thought about smothering it in barbecue sauce and making sandwiches. In the end, I was inspired by my brother and sister-in-law. They make stroganoff once a week and I realized that the meat would be perfect for that. Plus, I had mushrooms, an onion, sour cream, and pasta all waiting to be used.

Here's how it came together in the end:

In a stockpot, I melted the rendered fat which I removed from the beef and added a diced onion and a couple cups of diced mushrooms. I cooked them down for a bit with some salt, pepper, and a pinch of savory until the onions and mushrooms were just turning brown. I added about a quarter cup of flour and cooked it for a few minutes, then I added the beef which I had shredded and the gelatin as well along with a few shakes of Worcestershire sauce. I cooked the whole delicious smelling mess for a few more minutes and then added two cups of milk to create a cream sauce and let it simmer for about ten minutes to thicken up. After the stroganoff cooled, I stirred in a dollop of sour cream for added richness and tang and served (to myself) over noodles. Yum! I ended up with so much that I ate it for breakfast, lunch, and dinner for three days. I think I'm satiated now.

The only drawback I had was with the type of pasta I used; it turned out mushy. Like, icky mushy. I've used the particular brand of pasta before and it cooked up al dente. This shape of noodle recommended cooking for eight to ten minutes which usually means that I start testing them for doneness at six minutes. Which I did and they were already mushy. Not pleased. No pasta should ever be mushy, no matter what the intended use.

In the long run, my beef experiment turned out delicious and I found beef short ribs marked down $3 at the store, so I snapped them up and put them in the freezer for later in the month. I look forward to cooking those up and sharing the recipe with you!

Tuesday, January 6, 2015

Tortellini & Chicken Bake

I've been away too long, my faithful followers! The weekend after Thanksgiving, which was also my birthday, I picked up a nasty case of food poisoning somehow. That laid me low for a few days. Then I had to get a bunch of work done on my car the same week that I needed to move some stuff from one storage place to another. Once that was completed (and thank God for the people who helped me!!), I was able to do a little Christmas shopping for my little nieces and nephews and spend an afternoon with a good friend. And somewhere in there, I picked up a nasty case of bronchitis. Like, it's been nearly three weeks and I still have the occasional coughing fit. In spite of all that, I had a nice Christmas Eve dinner with part of my family; prime rib, mashed potatoes and gravy, green bean casserole, and roasted Brussels sprouts with sauteed mushrooms. We had pizza for our sibling get-together several days later; much more casual but just as delicious. Because it's pizza. And pizza is delicious.

That's been my life. I've missed cooking for myself, so I decided that I would make a list of eight different dishes to make over the course of a month, prepare two of them a week, and then blog about them. That's the extent of my New Year's resolutions, by the way. I don't do well with change; I have to ease into change, like introducing a cat to a dog. I also have a huge aversion to going with the flow. It literally makes my skin crawl to do what other people do and I rarely use the word, "literally" unlike Chris Traeger. 

This week so far, I made the following recipe and boy, I wish I had doubled it! It's definitely comfort food and it doesn't take much time to pull together.

Ingredients:

2 cups pre-cooked and shredded chicken
2 cups broccoli
1 package (16 ounces) frozen cheese-filled tortellini
5 tablespoons butter
5 tablespoons flour
2 and 1/2 cups chicken broth, warmed
1/2 cup milk, warmed
4 ounces cream cheese
Up to 1/2 cup breadcrumbs

Preheat oven to 350 degrees. Set aside a large baking dish, 9" by 13" at least. 

In a large bowl, combine the chicken, broccoli, and frozen tortellini. Set aside while you're making the sauce. 

In a large saucepan, melt the butter over medium high heat. Once it's melted, add the flour and cook for a couple minutes til smooth and lightly browned. Slowly add the warmed chicken broth and warmed milk, whisking constantly to ensure a smooth sauce. Continue to cook for a couple of minutes, remove from heat and then stir in the cream cheese. Taste and add salt and pepper according to your taste. Once you have a smooth sauce, gently pour over the chicken, broccoli, and tortellini. Toss gently to coat all ingredients with the sauce and transfer to the baking dish. Top with the breadcrumbs, if using, and a sprinkle of Parmesan if you so desire.

Bake for 30 minutes until bubbly and the breadcrumbs are golden brown. 

Cook's Notes:


  1. You can totally use precooked, shredded chicken for this dish instead of cooking your own. My Albertson's sells packages of roasted, shredded chicken which they pull off the unsold roasted chickens from the previous day. You can also poach several boneless chicken breasts and/or thighs ahead of time; there are endless possibilities for leftover chicken and it freezes beautifully.
  2. I prefer using fresh broccoli rather than frozen. Heck, I prefer fresh vegetables over frozen almost always. It's a texture thing; frozen veggies tend to be mushy. But it's up to you.
  3. The original recipe calls for making the roux (the sauce) with mostly milk rather than chicken stock. I switched the proportions and I think it was just right. The most important thing in making the roux is to cook the flour into the butter so you end up with a toasty flavor instead of a raw flour flavor.
  4. Cream cheese. The recipe calls for plain cream cheese but I had a partial container of chive cream cheese I needed to use up, so I used that instead. Amazing. It added just enough onion-y flavor without being overpowering. You can boost the flavor by adding garlic and/or onion powder to the roux.
  5. When I was at the store buying the ingredients, the frozen cheese tortellini were priced over a dollar more than the frozen cheese ravioli. So I bought the ravioli and used that instead. Use whatever stuffed pasta you prefer. 
I hope you try a new recipe or several new ones this year! I want to inspire you to be more confident in the kitchen and to step away from following recipes to the letter, to make substitutions and to trust your intuition.